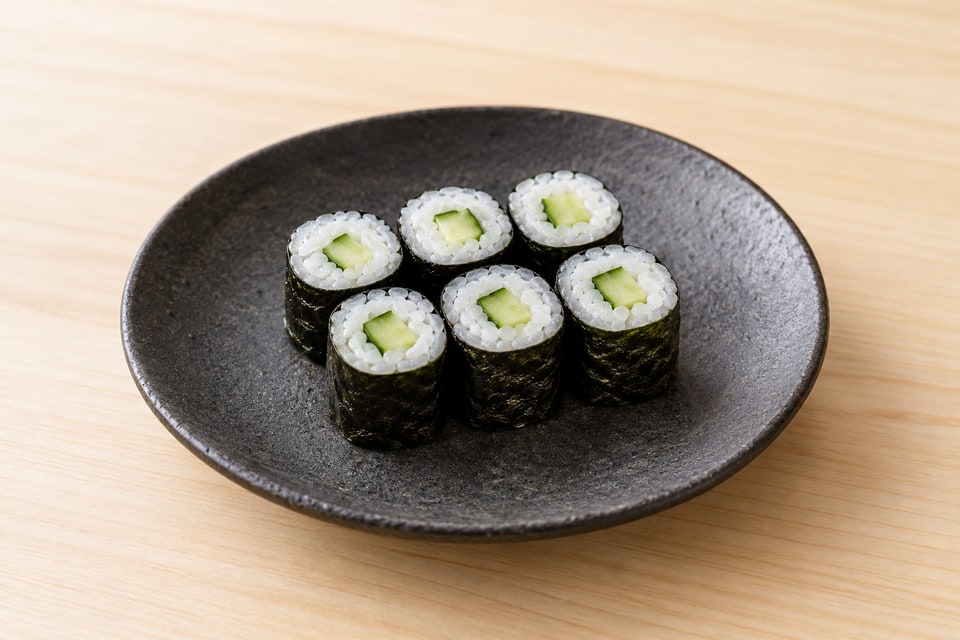
Understanding Hosomaki: The Thin Roll
Hosomaki, or thin rolls, are the foundational rolling technique and the first one to master. A hosomaki typically contains only one filling ingredient such as cucumber, tuna, or avocado, wrapped in nori and rice. The roll should be approximately 3/4 inch in diameter and produces six to eight uniform pieces when sliced. This simplicity makes hosomaki the perfect stepping stone: with fewer variables than a thick roll, you can focus entirely on rolling technique. The term "hosomaki" comes from "hoso," meaning thin, and "maki," meaning roll. A proper hosomaki is remarkably thin and requires precise spacing and just the right amount of filling. The beauty of hosomaki is its elegance—the thinness showcases the quality of ingredients and demonstrates rolling control.
Preparing Your Workspace and Materials
Lay your bamboo mat with the bamboo strips running horizontally in front of you. Place a half sheet of nori (a full sheet cut in half along its fold line, parallel to the long edge) shiny side down on the mat, long edge toward you, aligned with the edge of the mat closest to you. Have a small bowl of water and a damp towel nearby. Wet your hands thoroughly so rice doesn't stick to them—this is crucial. Spread a scant half cup (about 80-90 g) of cooled sushi rice evenly across the nori, using wet fingers to gently press and spread. For a thin roll, the rice layer should be thin and uniform—approximately 1/8 inch thick. Leave a small strip (about 1/2 inch) at the top of the nori without rice; this strip serves as an adhesive to seal the roll. This prep work requires deliberate focus. Rushing or careless spreading results in rolls that either don't seal or have uneven rice distribution.
Filling Placement and Proportioning
Place your filling (tuna, cucumber, or avocado) along the horizontal center line of the rice. For a thin roll, use only one ingredient in a modest amount—a strip about 3/8 to 1/2 inch (roughly 1 cm) square in cross-section running the full width of the nori, roughly 1 to 2 tablespoons (about 1 to 1.5 ounces) total. Too much filling bulges the roll and makes it difficult to seal. Beginners typically overfill; resist this temptation. The filling should be visible when you slice the finished roll, but it should not dominate the cross-section. If using tuna or other fish, cut sticks approximately 3/8 to 1/2 inch square in cross-section and long enough to span the entire width of the nori (lay shorter pieces end to end if needed). If using cucumber, cut matchsticks of similar thickness and lay them end to end across the full width. For raw fish, ask the supplier to document suitability for raw consumption and the applicable parasite controls. Keep it refrigerated until preparation. A label or visual inspection alone is not sufficient; see the Sourcing Fish Safely lesson and the linked FDA references. Position the filling in a perfectly straight line along the center of your rice. Precision here determines the quality of your finished roll. A wobbly, off-center filling line produces uneven pieces.
The Forward Roll Motion and Compression
This is the moment where technique diverges from confused attempts. Grasp the edge of the mat closest to you with both hands, placing your thumbs underneath and fingers on top. Roll the mat forward, bringing the near edge up and over the filling while simultaneously lifting the mat away from the roll. The nori and rice should roll forward smoothly, and the filling should be embraced by the rice. The key to a successful roll is the rolling motion: you're using the mat to help push the rice and nori forward and up and over, not pulling or forcing. Your hands should remain relatively relaxed. Once you've rolled forward and the filling is enclosed in rice, but the roll hasn't yet formed a complete cylinder, pause. Use gentle but firm pressure from your thumbs (underneath the mat) to compress the roll and form it into a cylinder. You're not smashing or crushing; you're applying consistent, even pressure along the entire length.
Sealing, Shaping, and Final Compression
Continue rolling the mat forward, enclosing the rice completely and bringing the nori's edge (which has no rice) to meet the underside of the roll. The nori edge should seal with the moisture from the rice and mat. Once the nori has sealed completely, you have a complete cylinder. Now place the seam side down on the mat and use firm, even pressure to compress and shape the roll. Some chefs shape as they roll; others shape after sealing. Both approaches work. Shape the roll into a slightly flattened cylinder or a squared-off log, depending on your preference. Most hosomaki in restaurants are lightly flattened. Apply pressure along the top and sides, adjusting as needed. This shaping should take only five to ten seconds. Excessive shaping creates a compressed, dense roll that loses the delicate texture rice should have.
Slicing and Plating Your First Roll
Once shaped, transfer the roll seam-side up to your cutting board. Using a very sharp, wet knife (wet it with water between each cut), slice the roll with a single forward motion—not a sawing motion. Slice into six to eight pieces, each approximately 1 inch wide. A hosomaki cut into six pieces yields slightly larger pieces; eight pieces yields smaller, more elegant pieces. Both are correct. As you slice, you should see the filling perfectly centered in each piece, with an even ring of rice around it. If the filling is off-center or the rice is uneven, take note for your next roll. Place the slices on a plate, typically with the cut side facing up so the interior is visible. The presentation should highlight the roll's cross-section and the contrast between nori, rice, and filling.
Common Mistakes and How to Fix Them
If your roll doesn't seal, the likely culprit is not enough moisture or not enough rice contact with the nori edge. Ensure your ingredients are properly wet and that you've left that crucial 1/2-inch rice-free strip at the top. If your roll is too bulky and won't compress into a cylinder, you overfilled it. Start your next roll with less filling. If the rice is lumpy or your filling is uneven after slicing, you either didn't spread rice evenly or the filling wasn't positioned precisely. If the nori tears during rolling, you pressed too hard before sealing. Let the rice and nori seal first, then apply pressure. If the rice is mushy and compressing excessively, your rice is too warm or too wet. Wait a few more minutes before rolling, or dry your hands more thoroughly. Each of these issues is fixable with minor adjustments. Expect your first roll to be imperfect. By roll three or four, you'll find a rhythm. By roll ten, they'll be remarkably consistent.
Keep these details in mind.
- Spread thin, even rice on nori, leaving the top edge clear to act as a seal
- Use minimal filling (about 1 to 2 tablespoons in a strip spanning the full width of the nori) positioned in a straight line along the center of the rice
- Roll forward smoothly using the mat to guide the motion; apply gentle compression as you roll, not crushing force
- Wet your knife between each cut; slice with a single forward motion, not a sawing motion
- Your first rolls won't be perfect; consistency develops with practice, usually by the fifth or sixth roll
From reading to cooking.
Cucumber Roll · Perfect Sushi Rice
Return to the journal ↗