Understanding Uramaki: Why It Was Invented
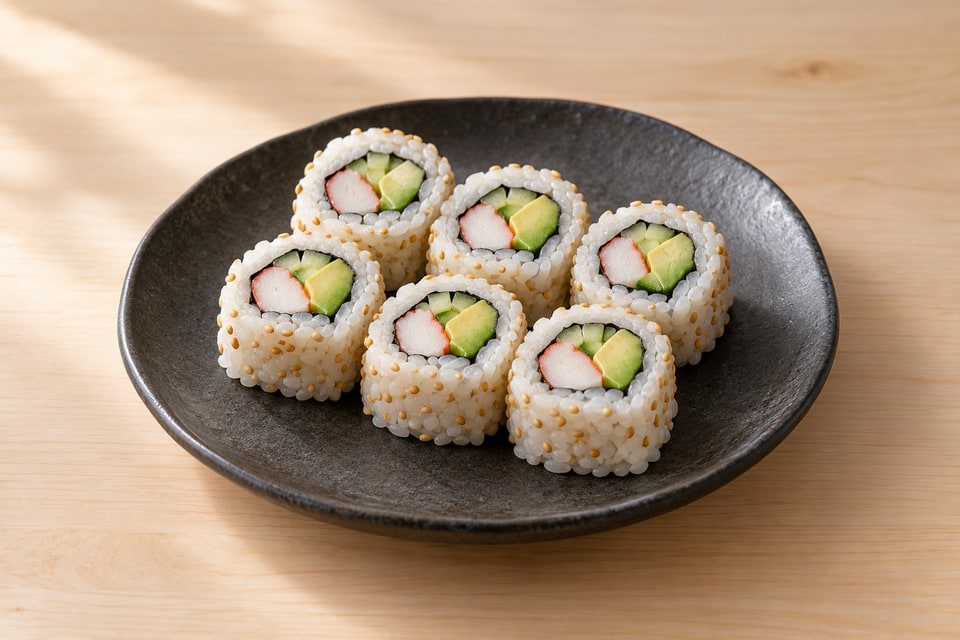
Uramaki (inside-out rolls) are rolls where rice is on the outside and nori is on the inside. They were invented in North America in the 1960s at a restaurant called the California Roll's purported birthplace, created to appeal to Western diners who found visible nori unappealing. The concept worked: by hiding the nori inside, the roll appears friendlier and more accessible. Today, uramaki are ubiquitous in sushi restaurants and home kitchens alike. An uramaki typically contains multiple ingredients (the California Roll contains imitation crab, avocado, and cucumber) and often includes a topping or garnish like sesame seeds, tobiko (flying fish roe), or cooked items. The technique requires more dexterity than hosomaki because you must manage both the mat and the rice, which is now on the outside. This added complexity makes it appropriate to master hosomaki before uramaki.
The Plastic Wrap Technique and Rice Management
Unlike hosomaki, you'll need plastic wrap for uramaki because rice on the outside would otherwise stick to your mat. Begin by covering your bamboo mat with a piece of plastic wrap, smooth and wrinkle-free. Place your nori on the plastic wrap with the shiny side down. Spread sushi rice across the nori as you would for hosomaki—evenly, thinly, covering the entire surface, leaving no bare edges. Here's the critical difference: once you've spread rice, carefully lift and flip the nori over (rice side down) while the mat remains stationary. The nori is now face-up and rice is facing the mat. This flip requires a calm, deliberate motion; rushing this step can cause the rice to shift or bunch. Let the nori settle on the mat for a moment. Your rice is now ready to receive its topping garnish—sesame seeds, tobiko, or other coatings.
Topping with Sesame or Tobiko
Before rolling, many uramaki are topped with sesame seeds, tobiko (flying fish roe), or other garnishes. This is when you apply these toppings. Sprinkle your chosen topping evenly across the rice. If using sesame, a light hand creates an elegant finish; heavy application becomes overwhelming. If using tobiko, apply it more thickly because you want visible pops of color and flavor in each slice. Press the topping gently into the rice so it adheres. Some chefs do this before flipping the nori; others do it after. Both approaches work. The timing is less critical than ensuring even coverage and proper adhesion. Too little topping looks sparse; too much becomes distracting. For your first uramaki, use sesame seeds—they're forgiving and create an attractive finish.
Placing Filling on the Reverse Side
Now comes the part that makes uramaki confusing at first. You need to place your filling, but your nori is face-up with rice on the underside facing the mat. You cannot place filling on top of rice that's facing down. Here's where the technique shines: you place filling on the nori itself (the side now facing up). Arrange your fillings in a horizontal line along the center of the nori. A classic California Roll uses imitation crab, avocado, and cucumber. Place each ingredient in its own lane along that center line. The ingredients touch the nori but sit on top of it, not embedded in rice. This placement requires practice because these ingredients are now outside the rice layer when you roll them, which means they're less secure. Pressing them gently onto the nori helps adhesion.
The Uramaki Roll Motion: Controlled and Deliberate
Now roll using the plastic-wrapped mat. Lift the mat and the plastic wrap together as a unit and roll forward, bringing the rice-topped nori forward and over the filling. The key difference from hosomaki is that your rice is on the outside, which means it's more fragile. Use a slightly gentler rolling motion to avoid crushing or smudging the rice. Once you've rolled forward and the roll is nearly complete, pause and compress gently to form the cylinder. You want the roll to be cohesive and tight, but not crushed. The plastic wrap protects the rice from being torn or marred by the mat. Once the roll has formed, you can carefully peel away the plastic wrap. The rice should now adhere to the nori on its own. If plastic remains stuck to the rice, it wasn't rolled firmly enough. Lay the plastic-wrapped roll on the mat and apply gentle but firm pressure to set and compress it.
Peeling the Plastic and Final Compression
Once the nori has sealed and the roll is formed into a cylinder, carefully pull the plastic wrap away. Start at one end and peel smoothly and evenly. If the plastic sticks or the rice seems to be pulling away, the roll wasn't set firmly enough—apply more pressure before attempting to unwrap. The finished roll should be a cohesive cylinder with rice on the outside, sesame or tobiko embedded in the rice, and nori on the inside visible only when sliced. Place the roll seam-side down on a clean cutting board and use your hands to apply final compression. Shape it into your preferred form—round, slightly flattened, or squared. Uramaki, because of their wider girth and heavier ingredients, benefit from a bit more compression than hosomaki, but again, you're not crushing. The roll should feel firm but not hard.
Slicing and Presentation
Slice your uramaki with a wet, sharp knife using single forward motions. The slice should reveal the cross-section with rice on the outside, sesame or other garnish visible in that rice, then layers of ingredients inside: perhaps crab, avocado, cucumber, and finally nori at the center. Each slice should be approximately 1 inch wide, yielding six to eight pieces. The presentation is beautiful: the rice exterior and sesame or tobiko creates visual interest that hosomaki lack. Arrange the pieces on a plate with the cross-section facing up so diners can see the multiple layers and ingredients. Uramaki are considered more approachable by many diners because the visible rice and toppings are less intimidating than the dark nori of hosomaki. Both have their place, and learning to make both shows mastery of the fundamental rolling technique.
Keep these details in mind.
- Uramaki places rice on the outside and nori on the inside using plastic wrap to prevent sticking to the mat
- Spread rice across nori, then carefully flip the nori over so rice faces down and nori faces up
- Apply sesame seeds or tobiko to the rice side before rolling to create the finished exterior
- Place filling ingredients on the nori side (now facing up) in a straight line along the center
- Roll smoothly and apply moderate compression; peel plastic wrap away before final shaping and slicing
From reading to cooking.
California Roll · Perfect Sushi Rice
Return to the journal ↗