The dish
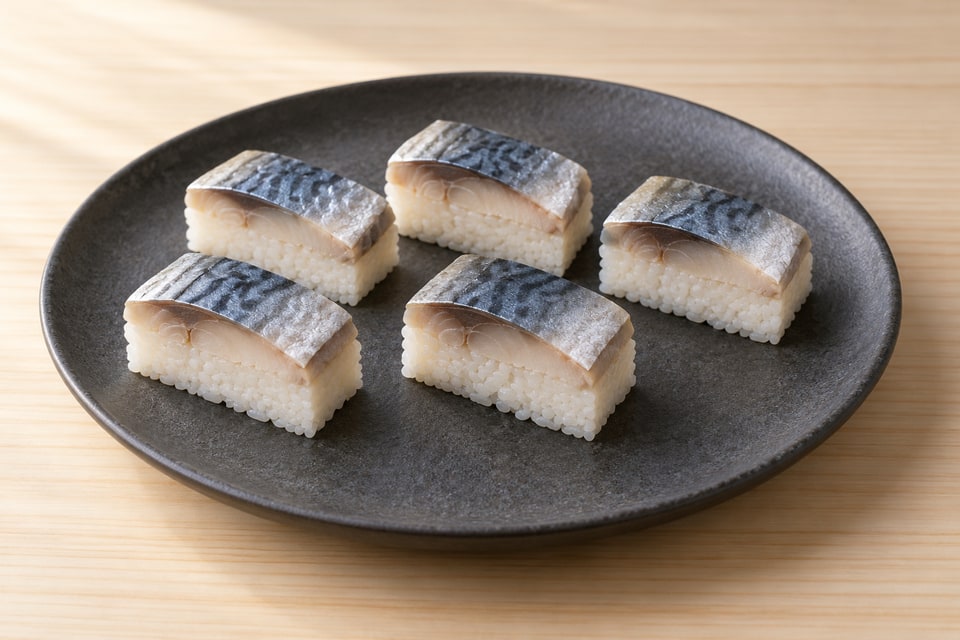
Pressed mackerel sushi layers supple prepared fish over softly pressed rice. This home version buys commercially prepared ready-to-eat shime saba rather than improvising the source’s short salt-and-vinegar treatment. Those treatments do not establish parasite destruction. A small lined rectangular dish replaces a wooden mold, and gentle pressure makes a coherent slab without turning the rice hard.
Good sushi preparation keeps each component legible. Rice contributes a gently acidic foundation, vegetables retain their own texture, and the topping or filling is handled with restraint. This home version uses measured portions and ordinary kitchen equipment, with specialist equipment alternatives stated below. Follow the sensory checks at each stage rather than treating a timer as the result. Prepare the accompaniments and the table before the final assembly. The final shape is a way of carrying the ingredients together; it should not compress soft rice or hide a wet filling. Make a small, careful batch and serve it promptly.
At a glance
| Item | Plan |
|---|---|
| Active time | About 25–35 minutes after rice preparation |
| Main technique | Layering and gentle mold pressure |
| Hands-off time | Rice hydration and covered rest; no additional long rest |
| Make-ahead | Prepare components as noted; assemble to order |
A closer look at the ingredients
Quantities live in the recipe card.
The structure and topping
each component supplies a separate texture.
Accompaniments
kept separate so every portion can be tasted before extra seasoning.
Before you begin
The craft, step by step
The complete method.
Read through once before you begin. The working recipe follows below.
Doneness & Quality Checkpoints
- Fish covers the mold’s footprint without a thick overlapping mound.
- Fish stays attached and the rectangular edges are clean.
- Mackerel is supple and no liquid pools beneath the rice.
- Rice should remain glossy and distinct, with a gentle give at the bite. Avoid forcing the grains into a hard mold.
- Judge the seasoning from the first finished portion. Extra soy sauce is a table choice; it should not replace the rice’s measured seasoning.
- Keep chilled ingredients cold until their brief assembly period. A pleasantly warm rice texture is a service goal, not a safe method for holding seafood.
Finish & Plate
Keep the topping and rice structure visible on a plain plate. Arrange small portions in a shallow group rather than a high stack. Use a clean plate and place the accompaniments alongside in separate small dishes. Leave enough room for each portion to be lifted without disturbing the next. A simple presentation makes it easy to see the filling, topping, and rice structure. Set the finished food on the table while the unused ingredients remain covered and cold. For a larger meal, prepare another small batch rather than forming an oversized tray far in advance.
The working recipe
Pressed Mackerel Sushi
Prep: 25–35 minutes, plus rice preparation · Cook: None; rice cooked separately · Total: About 1 hour 45 minutes including fresh rice · 2 (10–12 pieces)
Ingredients
The structure and topping
Accompaniments
Instructions
- Set out the accompaniments and prepared rice over 3–5 minutes so the final assembly is uninterrupted. Weigh the rice quantity specified rather than estimating from the dry-rice measure in the anchor. Keep chilled toppings covered until their preparation step. Checkpoint — Rice grains are gently warm and distinct, and the cold toppings remain refrigerated.
- Check the product label and supplier controls over 2–3 minutes, then inspect for bones and blot gently. Follow any instruction to remove vacuum packaging before thawing. Proper parasite freezing does not remove histamine formed during poor cold handling. Checkpoint — Fish is documented for ready-to-eat service and remains chilled.
- Line the mold and place mackerel presentation-side down in one even layer over 1–2 minutes. Add optional shiso in a single thin layer so the topping remains smooth. Checkpoint — Fish covers the mold’s footprint without a thick overlapping mound.
- Distribute rice evenly over the fish for 2–3 minutes. Add optional sesame within the rice and fill corners lightly with a damp paddle, leaving the grains distinct. Checkpoint — Rice is even and softly gathered.
- Cover with the wrap flap and press evenly with a flat board for 30–60 seconds, stopping when the layers hold. Do not add a prolonged warm resting or curing stage. Checkpoint — Slab is coherent but the grains remain recognizable.
- Lift and turn onto a clean board in 30–60 seconds, remove the wrap, and cut ten to twelve pieces over 3–4 minutes with a damp-clean sharp knife. Wipe between cuts to prevent dragging. Checkpoint — Fish stays attached and the rectangular edges are clean.
- Plate and serve within 2–3 minutes with soy sauce separate. Taste before adding seasoning because the commercial cure already contributes salt and acidity. Checkpoint — Mackerel is supple and no liquid pools beneath the rice.
Troubleshooting
| Symptom | Cause | Fix |
|---|---|---|
| Loose structure | Excess liquid or uneven shaping | Drain components and use one light contact |
| Hard rice center | Repeated pressure | Stop when the portion just holds |
| Rice sticks to tools or fingers | Dry contact surface | Use a thin tezu film and shake off dripping water |
| Dense rice bite | Repeated squeezing or pressing | Use one light shaping contact and stop when it holds |
| Watery presentation | Undrained filling or garnish | Drain and blot components before final assembly |
Storage, Make-Ahead & Variations
Serve freshly assembled sushi immediately. The nori loses its crisp edge and the rice firms as it stands; these are quality changes, not reliable signs of microbiological safety. Keep unused seafood covered in the refrigerator at 4 °C (40 °F) or colder, and follow its supplier’s shorter opening or thawing limit. For this home service, buy raw seafood for the same day and do not save an assembled raw-fish portion for tomorrow. Start a two-hour room-temperature clock when cooked rice leaves the heat, including cooling, assembly, and service. Shorten the limit to one hour in surroundings above 32 °C (90 °F). Refrigerate safe surplus promptly in shallow containers rather than preserving the warm texture on the counter. Discard food beyond that limit; reheating cannot reliably rescue temperature-abused rice. The rice anchor explains texture handling; this conservative holding limit governs safety. Measure sauces and wash vegetables ahead, refrigerating cut produce separately. Cook rice and cut seafood near service. Double by preparing two small batches, keeping unused seafood cold. This purchased-fish method is an explicit home adaptation. The live short home cure is not treated as validated. Follow the stated home version and label changes to cooked or commercial products. See Fish Safety & Sourcing for sourcing distinctions. The live starting material was harvested from https://sashimee.net/recipes/oshizushi.