The dish
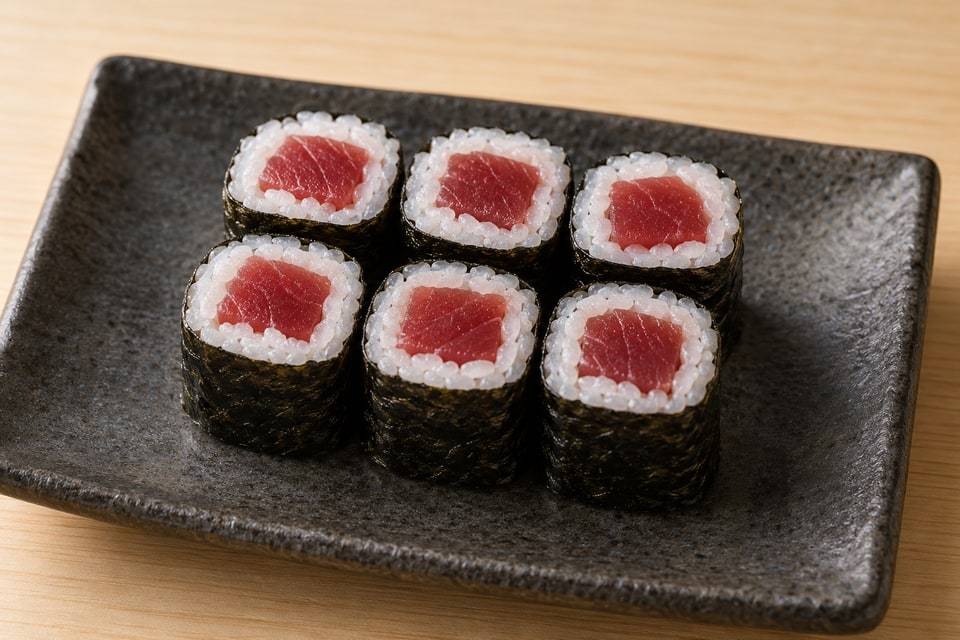
Tekka maki keeps lean tuna at the center of a narrow roll. The fish should be cut into even strips across the grain where the block permits, then enclosed with only a thin veil of rice. Wasabi is restrained. A clean red center and a crisp nori edge make the result more useful than extra garnish.
The rice is a thin, even layer, not a packing material. Keep the filling narrow and dry enough to stay in a clear line, then let the mat guide the shape with one gentle tightening. This home version uses an ordinary bamboo mat and a sharp knife. A clean towel can help shape a nori-outside roll if no mat is available. The yield is deliberately small so the last pieces reach the table while the seaweed still has an edge. Prepare the accompaniments first and work calmly; extra pressure cannot repair an overfilled roll.
At a glance
| Item | Plan |
|---|---|
| Active time | 25–35 minutes after rice preparation |
| Key technique | Half-sheet rolling with one narrow filling line |
| Waiting | Rice rest; no holding after final assembly |
| Make-ahead | Filling can be prepared as noted; roll near service |
| Yield | Four slim rolls, each cut into six |
A closer look at the ingredients
Quantities live in the recipe card.
The rice and nori
a light, even layer makes a roll that closes without force.
The filling
lean tuna supplies a single clean, savory center.
Hand water and accompaniments
keep the rice off your fingers and the seasoning controlled.
Before you begin
The craft, step by step
The complete method.
Read through once before you begin. The working recipe follows below.
Doneness & Quality Checkpoints
- Filling: Tuna strips are smooth, cohesive, and free of heavy sinew; no liquid pools in the filling bowl.
- Rice: seasoned, gently warm, and spread in a consistent veil; no hard or mashed patches.
- Shape: seam closed with light contact, no exposed filling at the sides, and no collapsed center.
- Cutting: clean edges and recognizable grains. A dragging blade needs cleaning and a steadier draw, not extra downward force.
- Flavor: Lean tuna first, mild rice acidity second, and wasabi behind both. Taste a piece before adding extra soy sauce; the filling may already contribute substantial salt.
Finish & Plate
Arrange the pieces with their cut sides visible, leaving enough space to lift one without shifting the others. Keep the dark seaweed border and the red center plainly visible. Set ginger, soy sauce, and optional wasabi in separate small dishes. A restrained presentation lets the contrast between the filling and rice carry the plate. Serve the first plate while the next is being cut. For a larger gathering, prepare separate small batches and replenish them from refrigerated filling. A big tray formed long before service sacrifices the seaweed texture and creates unnecessary holding time.
The working recipe
Tuna Roll
Prep: 25–35 minutes, plus rice preparation · Cook: None; rice cooked separately · Total: About 1 hour 40 minutes including fresh rice · 2 (24 small pieces)
Ingredients
The rice and nori
The filling
Hand water and accompaniments
Instructions
- Prepare the filling. Cut the chilled tuna into four evenly sized long strips over 3–5 minutes, trimming away connective tissue. Blot the surface gently and refrigerate until the nori is ready. Safety — Keep seafood at 4 °C (40 °F) or colder until preparation. For raw fish, obtain supplier confirmation of suitability for raw consumption and documented parasite controls; a “sushi-grade” label alone is insufficient. Freezing does not remove all bacterial hazards. Serve cooked alternatives to pregnant, older, immunocompromised, or very young guests. Checkpoint — Tuna strips are smooth, cohesive, and free of heavy sinew; no liquid pools in the filling bowl.
- Set out the rice and nori over 2–3 minutes. Divide the prepared rice into four 60 g (about ¼ cup) portions. Keep the nori dry until its turn. Mix the water and vinegar for tezu, dampen the hands, and shake off dripping water so the grains keep their seasoning.
- Spread the first rice portion over the nori in 45–75 seconds. Use the fingertips to distribute the rice gently, leaving a 10 mm (⅜ inch) bare strip along the far long edge for sealing. Keep the near and side edges evenly covered. Do not mash the grains to fill every visible gap. Checkpoint — The layer is level and thin, with no thick mound in the center. The bare sealing edge remains clean and dry.
- Place a quarter of the filling in a narrow horizontal line across the near-middle of the sheet over 30–60 seconds. Use one tuna strip per sheet and add only a restrained smear of the measured wasabi if desired. Keep the ingredients parallel and within the nori’s width. A small clear margin at each end makes the first turn easier.
- Close the first turn over 15–25 seconds. Lift the near edge of the mat with both hands, holding the filling gently in place with the fingertips. Bring that edge over the filling to meet the rice just beyond it. The mat guides the turn; it should not become wrapped inside the food. Checkpoint — The filling is enclosed without being squeezed out at the ends. If it is too thick, open this first turn and remove some filling before continuing.
- Finish and shape the roll over 20–30 seconds. Roll forward until the seam is underneath, then press lightly through the mat along its length. Release it and inspect both ends. Repeat steps 3–6 for the remaining sheets over 5–8 minutes, keeping unused filling cold. Checkpoint — The roll holds a round or softly squared profile without cracks. No sauce squeezes through the seam.
- Set each roll seam-side down for 30–60 seconds while readying the knife. This short contact helps the seaweed seal; it is not a holding period.
- Cut and plate over 3–5 minutes. Damp-clean the sharp blade, then halve each roll and cut each half into three pieces using gentle draws. Wipe the blade between cuts so loose starch does not drag the next slice. Keep the cross-sections visible and serve as soon as cut. Checkpoint — A clear tuna center runs through each piece, with a closed nori seam. The grains remain recognizable, and the filling sits as a clear center rather than a flattened smear.
Troubleshooting
| Symptom | Cause | Fix |
|---|---|---|
| Roll will not close | Too much filling or a thick rice layer | Remove filling and redistribute the rice before sealing |
| Rice squeezes from the ends | Mat pressed too firmly | Use one light tightening; keep the grains distinct |
| Nori cracks | Brittle sheet or force at the first turn | Use fresh nori and let the mat guide a smooth curve |
| Blade tears the roll | Starch buildup or dull edge | Damp-clean the blade between cuts and sharpen it |
| Watery center | Wet filling or undrained sauce | Blot or drain the components before placing them in a line |
| Tuna pulls out during cutting | Heavy sinew or a short, forceful blade stroke | Trim sinew before rolling and draw a clean blade through the roll |
Storage, Make-Ahead & Variations
Serve freshly assembled sushi immediately. The nori loses its crisp edge and the rice firms as it stands; these are quality changes, not reliable signs of microbiological safety. Keep unused seafood covered in the refrigerator at 4 °C (40 °F) or colder, and follow its supplier’s shorter opening or thawing limit. For this home service, buy raw seafood for the same day and do not save an assembled raw-fish portion for tomorrow. Start a two-hour room-temperature clock when cooked rice leaves the heat, including cooling, assembly, and service. Shorten the limit to one hour in surroundings above 32 °C (90 °F). Refrigerate safe surplus promptly in shallow containers rather than preserving the warm texture on the counter. Discard food beyond that limit; reheating cannot reliably rescue temperature-abused rice. The rice anchor explains texture handling; this conservative holding limit governs safety. Measure sauces and wash vegetables ahead, refrigerating cut produce separately. Cook rice and cut seafood near service. Double by preparing two small batches, keeping unused seafood cold. Cut tuna close to assembly and keep it covered and chilled between rolls. A fully cooked tuna filling is a useful alternative, but label it as cooked rather than tekka maki with raw tuna. The live record was harvested from https://sashimee.net/recipes/tekka-maki. Regional or modern variants are labeled here rather than presented as one fixed universal version.