The dish
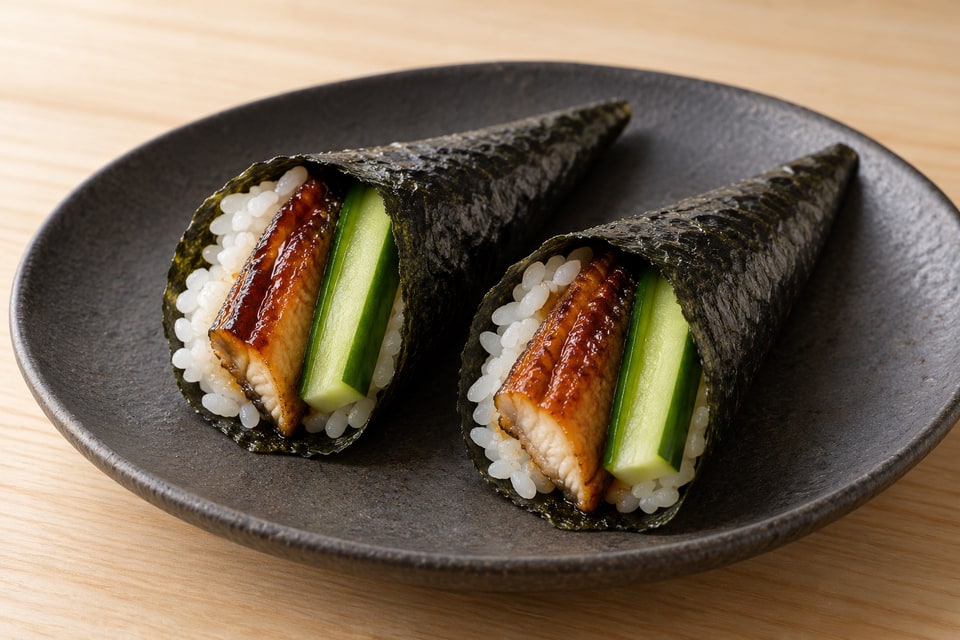
Eel cucumber temaki uses warm, fully cooked kabayaki eel beside a crisp cucumber strip. The sweet glaze should be a light brush, not a liquid filling. This home version reheats the purchased eel separately and forms the cone to order. Raw freshwater eel is not used; the reliable preparation begins with a fully cooked product.
Good sushi preparation keeps each component legible. Rice contributes a gently acidic foundation, vegetables retain their own texture, and the topping or filling is handled with restraint. This home version uses measured portions and ordinary kitchen equipment, with specialist equipment alternatives stated below. Follow the sensory checks at each stage rather than treating a timer as the result. Prepare the accompaniments and the table before the final assembly. The final shape is a way of carrying the ingredients together; it should not compress soft rice or hide a wet filling. Make a small, careful batch and serve it promptly.
At a glance
| Item | Plan |
|---|---|
| Active time | About 25–35 minutes after rice preparation |
| Main technique | Small rice triangles and a nori cone |
| Hands-off time | Rice hydration and covered rest; no additional long rest |
| Make-ahead | Prepare filling components ahead; form each cone to order |
A closer look at the ingredients
Quantities live in the recipe card.
Rice and nori
a small rice triangle leaves enough dry seaweed to form a crisp cone.
The filling
cooked glazed eel and cucumber balance richness with crunch.
Accompaniments
kept separate so every portion can be tasted before extra seasoning.
Before you begin
The craft, step by step
The complete method.
Read through once before you begin. The working recipe follows below.
Doneness & Quality Checkpoints
- Eel is hot through and soft, with a restrained glossy glaze; cucumber is crisp and surface-dry.
- Cone: closed point, dry outer surface, and no loose sauce at the seam.
- Rice: a small, gently gathered portion that releases at the bite.
- Rice should remain glossy and distinct, with a gentle give at the bite. Avoid forcing the grains into a hard mold.
- Judge the seasoning from the first finished portion. Extra soy sauce is a table choice; it should not replace the rice’s measured seasoning.
- Keep chilled ingredients cold until their brief assembly period. A pleasantly warm rice texture is a service goal, not a safe method for holding seafood.
Finish & Plate
Show the eel’s glazed edge and keep the cone’s exterior free of sauce. Stand a cone only if it can be supported without crushing the point; handing it directly to the diner is usually simpler. Use a clean plate and place the accompaniments alongside in separate small dishes. Leave enough room for each portion to be lifted without disturbing the next. A simple presentation makes it easy to see the filling, topping, and rice structure. Set the finished food on the table while the unused ingredients remain covered and cold. For a larger meal, prepare another small batch rather than forming an oversized tray far in advance.
The working recipe
Eel & Cucumber Temaki
Prep: 25–35 minutes, plus rice preparation · Cook: 10–15 minutes eel reheating · Total: About 2 hours including fresh rice · 2 (4 hand rolls)
Ingredients
Rice and nori
The filling
Accompaniments
Instructions
- Prepare the filling. Reheat the thawed cooked eel as its label directs. Without a different instruction, allow 10–15 minutes in a 180 °C (350 °F) oven, confirming a hot center at 74 °C (165 °F). Rest 2–3 minutes and cut four narrow filling portions. Seed and cut cucumber over 2–3 minutes. Brush the eel with the measured tare. Checkpoint — Eel is hot through and soft, with a restrained glossy glaze; cucumber is crisp and surface-dry.
- Divide the rice into four 50 g (about ¼ cup) portions over 2–3 minutes. Mix the tezu, dampen only the rice-handling fingertips, and shake off drops. This measured portion leaves room for a modest filling and a closing nori flap. Keep the other hand dry for holding seaweed. Checkpoint — Rice portions are loose and equal; the nori-handling palm stays dry.
- Set one half sheet shiny-side down across the dry palm in 5–10 seconds. Spread a rice portion over the left third in a loose triangular patch over 20–30 seconds, with its broad part near the top edge. Do not cover the whole sheet. Checkpoint — Rice forms a light triangle, with most of the sheet still bare.
- Lay a quarter of the filling diagonally through the rice over 15–25 seconds. Place eel beside cucumber and sprinkle optional sesame inside, not over the sealing flap. Aim the top ends toward the open mouth of the cone and keep the lower end narrow, so the base can close without a bulky plug. Checkpoint — The filling is narrow at the bottom and sits within the rice triangle.
- Lift the lower-left nori corner up toward the center in 10–20 seconds, enclosing the rice into a cone. Wrap the remaining bare sheet around it with a gentle turn. Support the cone’s point instead of squeezing its body. Checkpoint — The cone has a closed point and an open, tidy mouth; the rice remains soft.
- Seal the last flap with one or two grains taken from the cone’s edge over 5–10 seconds. Press the seam lightly. Do not soak the seaweed to make it stick; localized rice starch is sufficient for a brief service. Checkpoint — The flap stays in place without a wet patch covering the exterior.
- Serve this cone within 1–2 minutes and repeat for the remaining three over 4–6 minutes. Let the diner taste before adding soy sauce or extra wasabi. Keep unused filling cold while forming the next cone, so the meal proceeds one small piece at a time. Checkpoint — Nori retains a crisp edge and the filling stays distinct at the opening.
Troubleshooting
| Symptom | Cause | Fix |
|---|---|---|
| Cone opens | Rice spread over too much nori | Keep rice to the first third and use a rice-grain seal |
| Nori turns leathery | Cone formed too early or held in a wet hand | Use a dry palm and form to order |
| Sweet sauce drips from the cone | Too much tare or a wet eel surface | Use a light measured brush and drain excess sauce |
| Rice sticks to tools or fingers | Dry contact surface | Use a thin tezu film and shake off dripping water |
| Dense rice bite | Repeated squeezing or pressing | Use one light shaping contact and stop when it holds |
| Watery presentation | Undrained filling or garnish | Drain and blot components before final assembly |
Storage, Make-Ahead & Variations
Serve freshly assembled sushi immediately. The nori loses its crisp edge and the rice firms as it stands; these are quality changes, not reliable signs of microbiological safety. Keep unused seafood covered in the refrigerator at 4 °C (40 °F) or colder, and follow its supplier’s shorter opening or thawing limit. For this home service, buy raw seafood for the same day and do not save an assembled raw-fish portion for tomorrow. Start a two-hour room-temperature clock when cooked rice leaves the heat, including cooling, assembly, and service. Shorten the limit to one hour in surroundings above 32 °C (90 °F). Refrigerate safe surplus promptly in shallow containers rather than preserving the warm texture on the counter. Discard food beyond that limit; reheating cannot reliably rescue temperature-abused rice. The rice anchor explains texture handling; this conservative holding limit governs safety. Measure sauces and wash vegetables ahead, refrigerating cut produce separately. Cook rice and cut seafood near service. Double by preparing two small batches, keeping unused seafood cold. Warm only the eel required for the batch and serve cones immediately. A commercially prepared cooked-eel product varies in glaze strength; adjust the extra tare rather than the rice seasoning. See Fish Safety & Sourcing for sourcing distinctions. The live starting material was harvested from https://sashimee.net/recipes/unagi-cucumber-temaki.