The dish
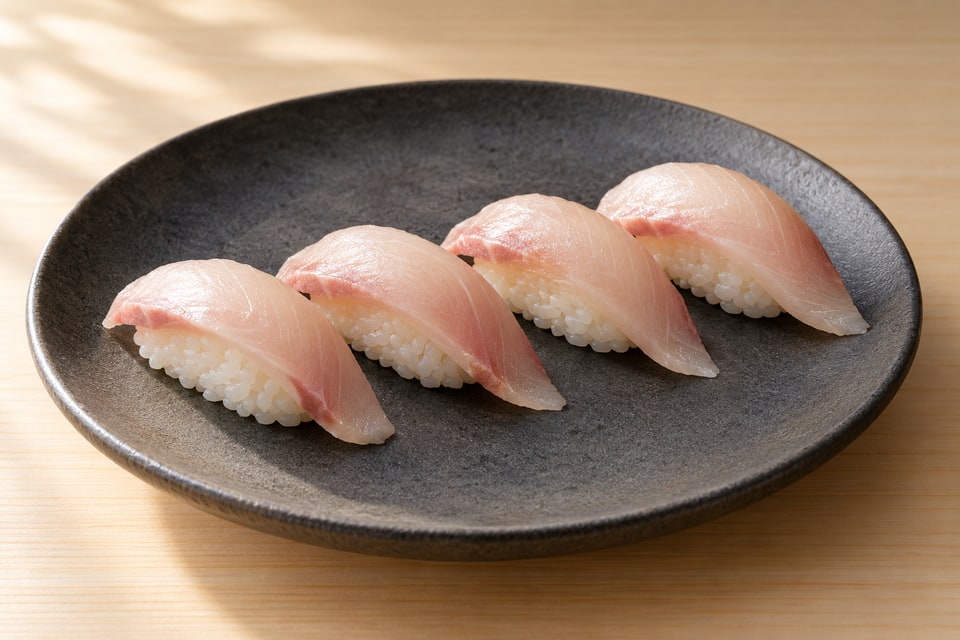
Yellowtail brings a mild, buttery richness without needing a glaze. The clean loin is easier to slice than a thin belly flap, and a narrow removal of the dark bloodline helps the fish’s sweetness remain distinct. Hamachi is a common market name; ask the supplier which species and production method they mean. This version keeps the topping simple, with scallion available as a restrained modern accent.
Nigiri is a small construction with a narrow margin for excess. The topping should drape; the rice should support it without becoming a compressed pellet. This home version uses a scale for the first pieces and an ordinary sharp knife in place of a counter’s long specialist blade. Its standard is the same: clean cuts, restrained seasoning, and rice that releases at the first bite. Prepare the table before the final shaping. These pieces are best served in a small sequence, while the topping is cool and the rice still gently warm.
At a glance
| Item | Plan |
|---|---|
| Active work | About 25–35 minutes, with rice prepared first |
| Hands-off work | Rice hydration and covered rest; see the anchor recipe |
| Key techniques | bloodline trimming and angled slicing; light rice shaping; immediate service |
| Make-ahead verdict | Prepare accompaniments ahead; shape to order |
| Yield | Eight pieces, four per person as a light course |
A closer look at the ingredients
Quantities live in the recipe card.
The topping
a clean yellowtail loin makes a supple, lightly rich topping.
The rice and hand water
supple grains and damp fingers allow a light, coherent shape.
At the table
separate accompaniments let each bite retain its own balance.
Before you begin
The craft, step by step
The complete method.
Read through once before you begin. The working recipe follows below.
Doneness & Quality Checkpoints
- Topping: The loin slices bend softly, have a clean pale surface, and contain no hard pin bones or heavy bloodline.
- Cutting: a smooth face with no torn edges or repeated saw marks; slice across visible muscle fibers when relevant.
- Rice: each 20 g (about 1 tablespoon) base holds with light pressure and separates easily at the bite. A dense, rubbery center means excessive handling.
- Balance: the topping leads, the rice contributes mild acidity, and wasabi stays a quiet accent. Soy sauce should support that balance rather than soak the base.
- Service: The fish drapes naturally, with no compressed fingerprints or scattered scallion mound. Keep seafood cold until the brief assembly period; the warm-rice contrast is a service choice, not a holding method.
Finish & Plate
Arrange four pieces on each small plate with a finger’s width between them, so they can be picked up without disturbing the next piece. Use a plain plate that shows the cut surface and the rice’s outline. Put ginger alongside, not on top. Use the optional scallion sparingly; its fresh edge should follow the fish, not precede it. Offer the next batch when the first has been eaten. A calm pace comes from keeping the cold ingredients covered and ready, rather than forming the whole meal in advance. For a larger supper, accompany the pieces with a simple cooked vegetable or soup.
The working recipe
Yellowtail Nigiri
Prep: 25–35 minutes, plus rice preparation · Cook: None; rice cooked separately · Total: About 1 hour 35 minutes including fresh rice · 2 (8 nigiri)
Ingredients
The topping
The rice and hand water
At the table
Instructions
- Set the cold ingredients and rice in order, taking 3–5 minutes. Safety — Keep seafood at 4 °C (40 °F) or colder until preparation. For raw fish, obtain supplier confirmation of suitability for raw consumption and documented parasite controls; a “sushi-grade” label alone is insufficient. Freezing does not remove all bacterial hazards. Serve cooked alternatives to pregnant, older, immunocompromised, or very young guests. Keep the topping covered and cold until its preparation step. This order reduces both unnecessary warming and last-minute handling. Checkpoint — The board is clean and stable, the rice grains glisten separately, and the topping remains chilled. An unpleasant odor or slimy surface calls for disposal; a clean smell does not establish raw-fish safety.
- Prepare the topping. Spend 4–6 minutes checking for bones and trimming the bloodline. Slice across the grain with a shallow diagonal pull, making eight flexible slices around 4–6 mm (⅛–¼ inch) thick. Let the block’s width determine the angle. Portion about 16–20 g (½–¾ ounce) of fish per piece. Checkpoint — The loin slices bend softly, have a clean pale surface, and contain no hard pin bones or heavy bloodline.
- Make tezu in 30–60 seconds by combining the measured water and vinegar. Dampen the fingertips and palms, then shake off droplets; a thin film prevents sticking without watering down the rice. Keep the bowl away from raw packaging and replace it if contaminated. Checkpoint — Fingers feel damp, with no water dripping into the rice bowl. If rice sticks, re-dampen your hands rather than squeezing harder.
- Divide the rice into eight 20 g (about 1 tablespoon) portions over 2–3 minutes. Weigh the first portion and compare the others against it. Use loosely gathered grains, taking them from the bowl with the fingertips. A rough oblong is enough at this stage; the rice does not need to resemble a polished mold.
- Form one base in 15–25 seconds. Cup a rice portion lightly and press it just enough to hold when lifted. Leave the underside softly rounded and the top broad enough for the topping. The shape should be longer than it is wide, with no projecting loose grains. Checkpoint — The base survives transfer but yields when gently pressed; it is neither crumbly nor hard.
- Season and assemble each piece in 15–30 seconds. Apply the wasabi beneath the fish and, if using scallion, place only a few thin rings on each finished piece. Place the topping over the rice and press lightly along its center, supporting the sides with the other hand. Avoid touching the presentation face more than necessary. Return unused seafood to the refrigerator between batches.
- Inspect each piece for 5–10 seconds. Turn the plate, not the topping, to check its shape. The topping should follow the rice’s curve without curling away at the ends. Correct a loose edge with one light press. Do not try to make a fragile slice obey repeated handling. Checkpoint — A clean outline, an intact topping, and gently separate rice grains are visible from the side. The fish drapes naturally, with no compressed fingerprints or scattered scallion mound.
- Plate and serve the batch within 2–3 minutes of finishing. Divide the ginger and soy sauce between side dishes, leaving the sushi surface clean. Dip the topping lightly if desired; flooding the rice hides its seasoning and loosens the base. Taste the first piece before adding more wasabi or soy sauce to subsequent bites.
Troubleshooting
| Symptom | Cause | Fix |
|---|---|---|
| Rice sticks to fingers | Hands too dry or excessive handling | Refresh the tezu film and use lighter, fewer presses |
| Base falls apart | Rice too cool or insufficient initial contact | Use freshly prepared supple rice and one gentle center press |
| Topping tears | Dull edge, sawing, or forcing the slice | Use a sharp blade and one long draw; adjust the slice width to the block |
| Heavy, compressed bite | Rice base squeezed repeatedly | Form a fresh portion and stop when it just holds |
| Watery plate | Wet topping or dripping hands | Blot the topping gently and shake excess tezu from fingers |
| A metallic flavor overwhelms the topping | Too much dark bloodline remains | Trim the remaining block narrowly and keep the garnish restrained |
Storage, Make-Ahead & Variations
Serve freshly assembled sushi immediately. The nori loses its crisp edge and the rice firms as it stands; these are quality changes, not reliable signs of microbiological safety. Keep unused seafood covered in the refrigerator at 4 °C (40 °F) or colder, and follow its supplier’s shorter opening or thawing limit. For this home service, buy raw seafood for the same day and do not save an assembled raw-fish portion for tomorrow. Start a two-hour room-temperature clock when cooked rice leaves the heat, including cooling, assembly, and service. Shorten the limit to one hour in surroundings above 32 °C (90 °F). Refrigerate safe surplus promptly in shallow containers rather than preserving the warm texture on the counter. Discard food beyond that limit; reheating cannot reliably rescue temperature-abused rice. The rice anchor explains texture handling; this conservative holding limit governs safety. Measure sauces and wash vegetables ahead, refrigerating cut produce separately. Cook rice and cut seafood near service. Double by preparing two small batches, keeping unused seafood cold. A few drops of ponzu can replace part of the table soy sauce, but make that a labeled modern serving choice. Keep the rice seasoning unchanged. For the sourcing distinctions, read Fish Safety & Sourcing. The live starting point was https://sashimee.net/recipes/hamachi-nigiri, harvested on 2026-10-02; its timing and safety assertions were checked and corrected during this rewrite.